Tuesday, August 23, 2011
Monday, August 15, 2011
Make Something Monday : Last Minute Birthday Stuff
I can't believe the babe's party is just a few days away!! I am really looking forward to all the family that is going to come. In the midst of trying to scrub the house and get it "guest-ready" I managed to finish a few final party items.
Using the giraffe image, scalloped cardstock circles, and colored toothpicks, I made these super cute and fairly simple cupcake toppers:

Instead of party hats I wanted to make these fun giraffe ears for all our guests to wear. I can't wait to take a picture of everyone wearing them! :)

I found the printable pattern here.
And, finally, to show everyone how much Henry has grown over the past year I wanted to display all of the monthly pictures I have taken of him. My sister-in-law gave me this pretty giraffe fabric that I wrapped around a canvas to use as a backdrop.

Well, I think we are ready for a party now!
Come back next week to see if it all came together...
Wednesday, August 10, 2011
Ten on Ten : August 2011
It's time for my second installment of Ten on Ten. Inspired by A Bit of Sunshine.
I almost forgot this morning, but got my camera out just in time to capture Henry waking up from his nap.
Yes, he really is always this happy.

In case you don't know what Ten on Ten is all about it's a blogging challenge to take one photo an hour for 10 hours on the 10th day of the month. Basically, to encourage you to recognize the beautiful moments in a normal day. I really think it's working - normally, I wouldn't do a "drive-by shooting" of a high school football practice but today, as summer is ending, I noticed several teams gearing up for the new season. I became especially nostalgic when I saw a high school marching band practicing (they had left before I turned back around for a picture!). I have so many fun memories of marching in the HOT HOT sun with all my best friends - taking breaks at Sonic and enjoying the last few days of summer vacation.

Henry and I had a playdate with our friends Laila and Zayden at Hastings. The boys crawled all over the kid area and they pulled just about every book off the shelves!

Wearing my favorite nail polish with my favorite sandals - always makes me happy!

Back at home, where we spent the majority of this summer day, the babe and I enjoyed our favorite snack:

As I was putting away my makeup today, I thought I should give a shout out to my favorite product - Urban Decay 24/7 eyeliner. This stuff is awesome! It glides on so smoothly and seriously lasts 24/7 (okay, so maybe only 24/1, but hey, that's still pretty good).

I gave in and let Henry open an early birthday present. Mema Jeanne and Grandpa Ray mailed him a special package that I was going to keep until his party, but he found it today and managed to pull it off the table, so hey, I might as well let him enjoy it now. As you can see, he definitely enjoyed it. And, as you can also see, we rarely wear pants in this house :)

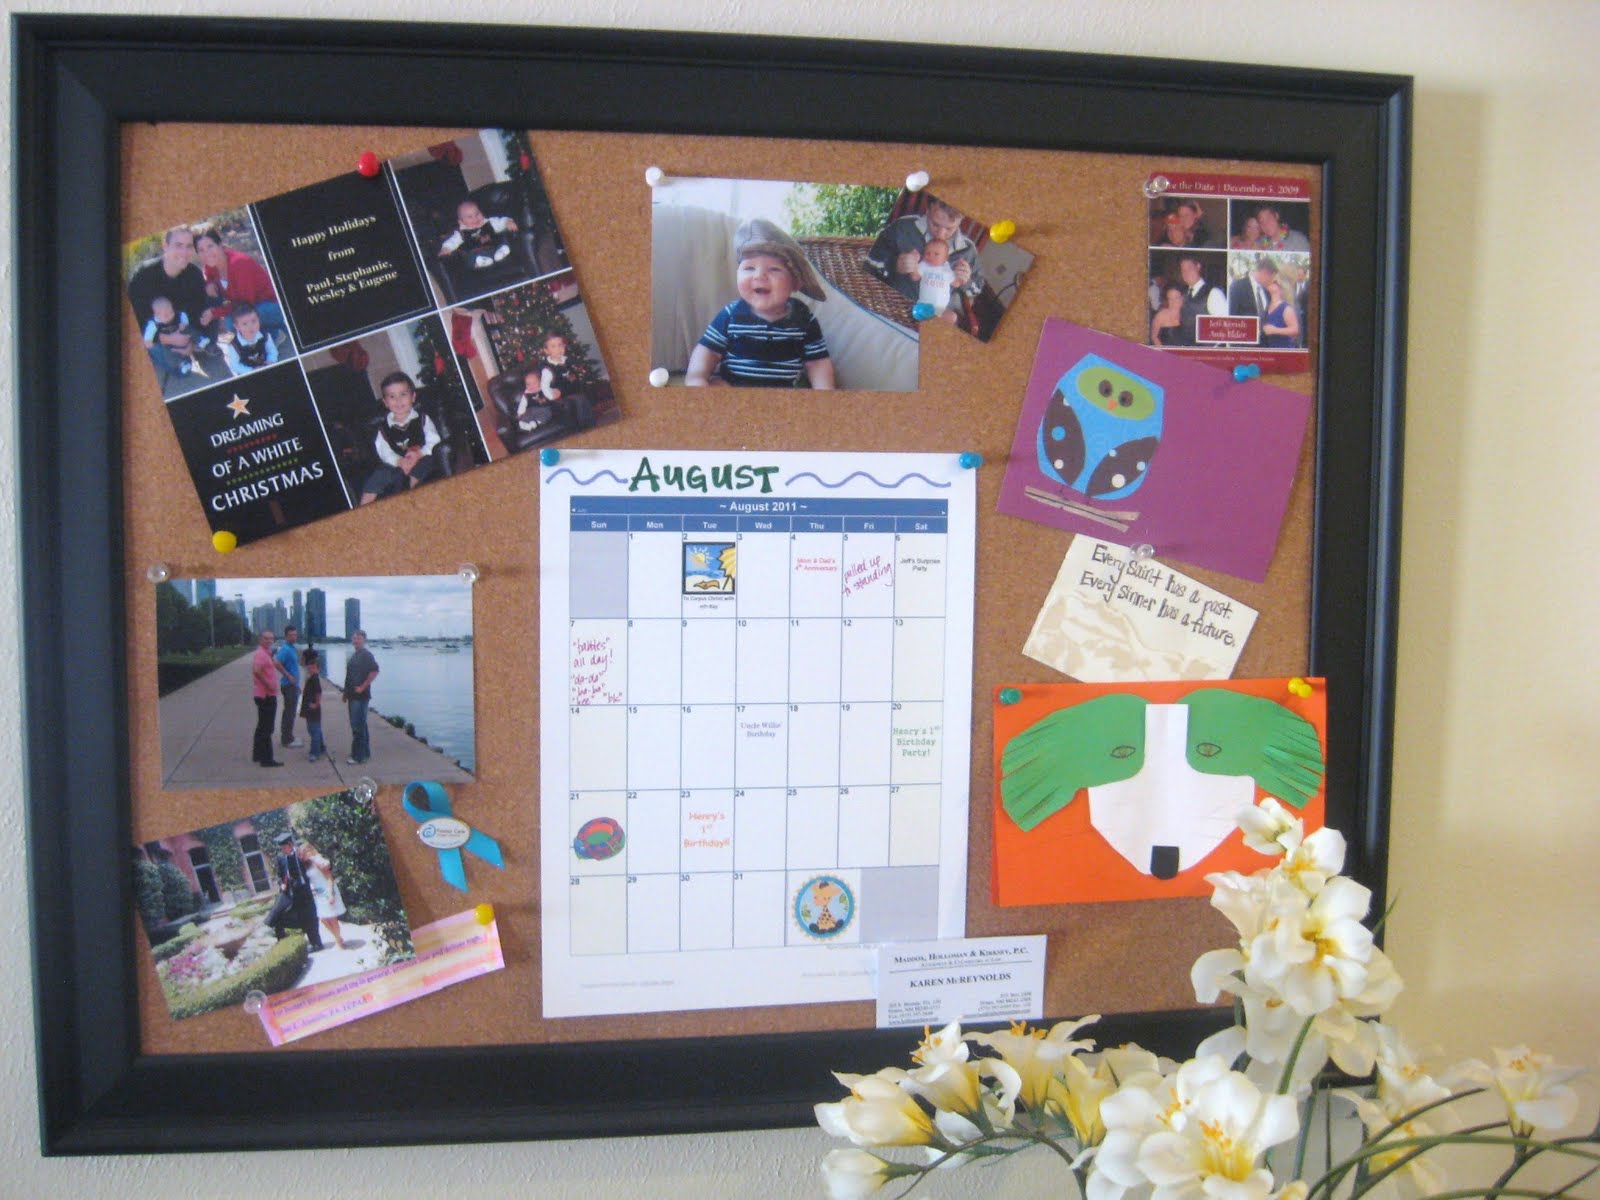
This is the bulletin board that I made (out of an old picture frame) for our living room/office area. I love being able to easily see special photos and cards as well as some favorite quotes, and a monthly calendar where I document the babe's milestones.

Like father, like son...

This kid loves his bath time!

And that about sums up August 10, 2011 at the Yehl house.

I almost forgot this morning, but got my camera out just in time to capture Henry waking up from his nap.
Yes, he really is always this happy.

In case you don't know what Ten on Ten is all about it's a blogging challenge to take one photo an hour for 10 hours on the 10th day of the month. Basically, to encourage you to recognize the beautiful moments in a normal day. I really think it's working - normally, I wouldn't do a "drive-by shooting" of a high school football practice but today, as summer is ending, I noticed several teams gearing up for the new season. I became especially nostalgic when I saw a high school marching band practicing (they had left before I turned back around for a picture!). I have so many fun memories of marching in the HOT HOT sun with all my best friends - taking breaks at Sonic and enjoying the last few days of summer vacation.

Henry and I had a playdate with our friends Laila and Zayden at Hastings. The boys crawled all over the kid area and they pulled just about every book off the shelves!

Wearing my favorite nail polish with my favorite sandals - always makes me happy!

Back at home, where we spent the majority of this summer day, the babe and I enjoyed our favorite snack:

As I was putting away my makeup today, I thought I should give a shout out to my favorite product - Urban Decay 24/7 eyeliner. This stuff is awesome! It glides on so smoothly and seriously lasts 24/7 (okay, so maybe only 24/1, but hey, that's still pretty good).

I gave in and let Henry open an early birthday present. Mema Jeanne and Grandpa Ray mailed him a special package that I was going to keep until his party, but he found it today and managed to pull it off the table, so hey, I might as well let him enjoy it now. As you can see, he definitely enjoyed it. And, as you can also see, we rarely wear pants in this house :)

This is the bulletin board that I made (out of an old picture frame) for our living room/office area. I love being able to easily see special photos and cards as well as some favorite quotes, and a monthly calendar where I document the babe's milestones.
Like father, like son...

This kid loves his bath time!

And that about sums up August 10, 2011 at the Yehl house.
Monday, August 8, 2011
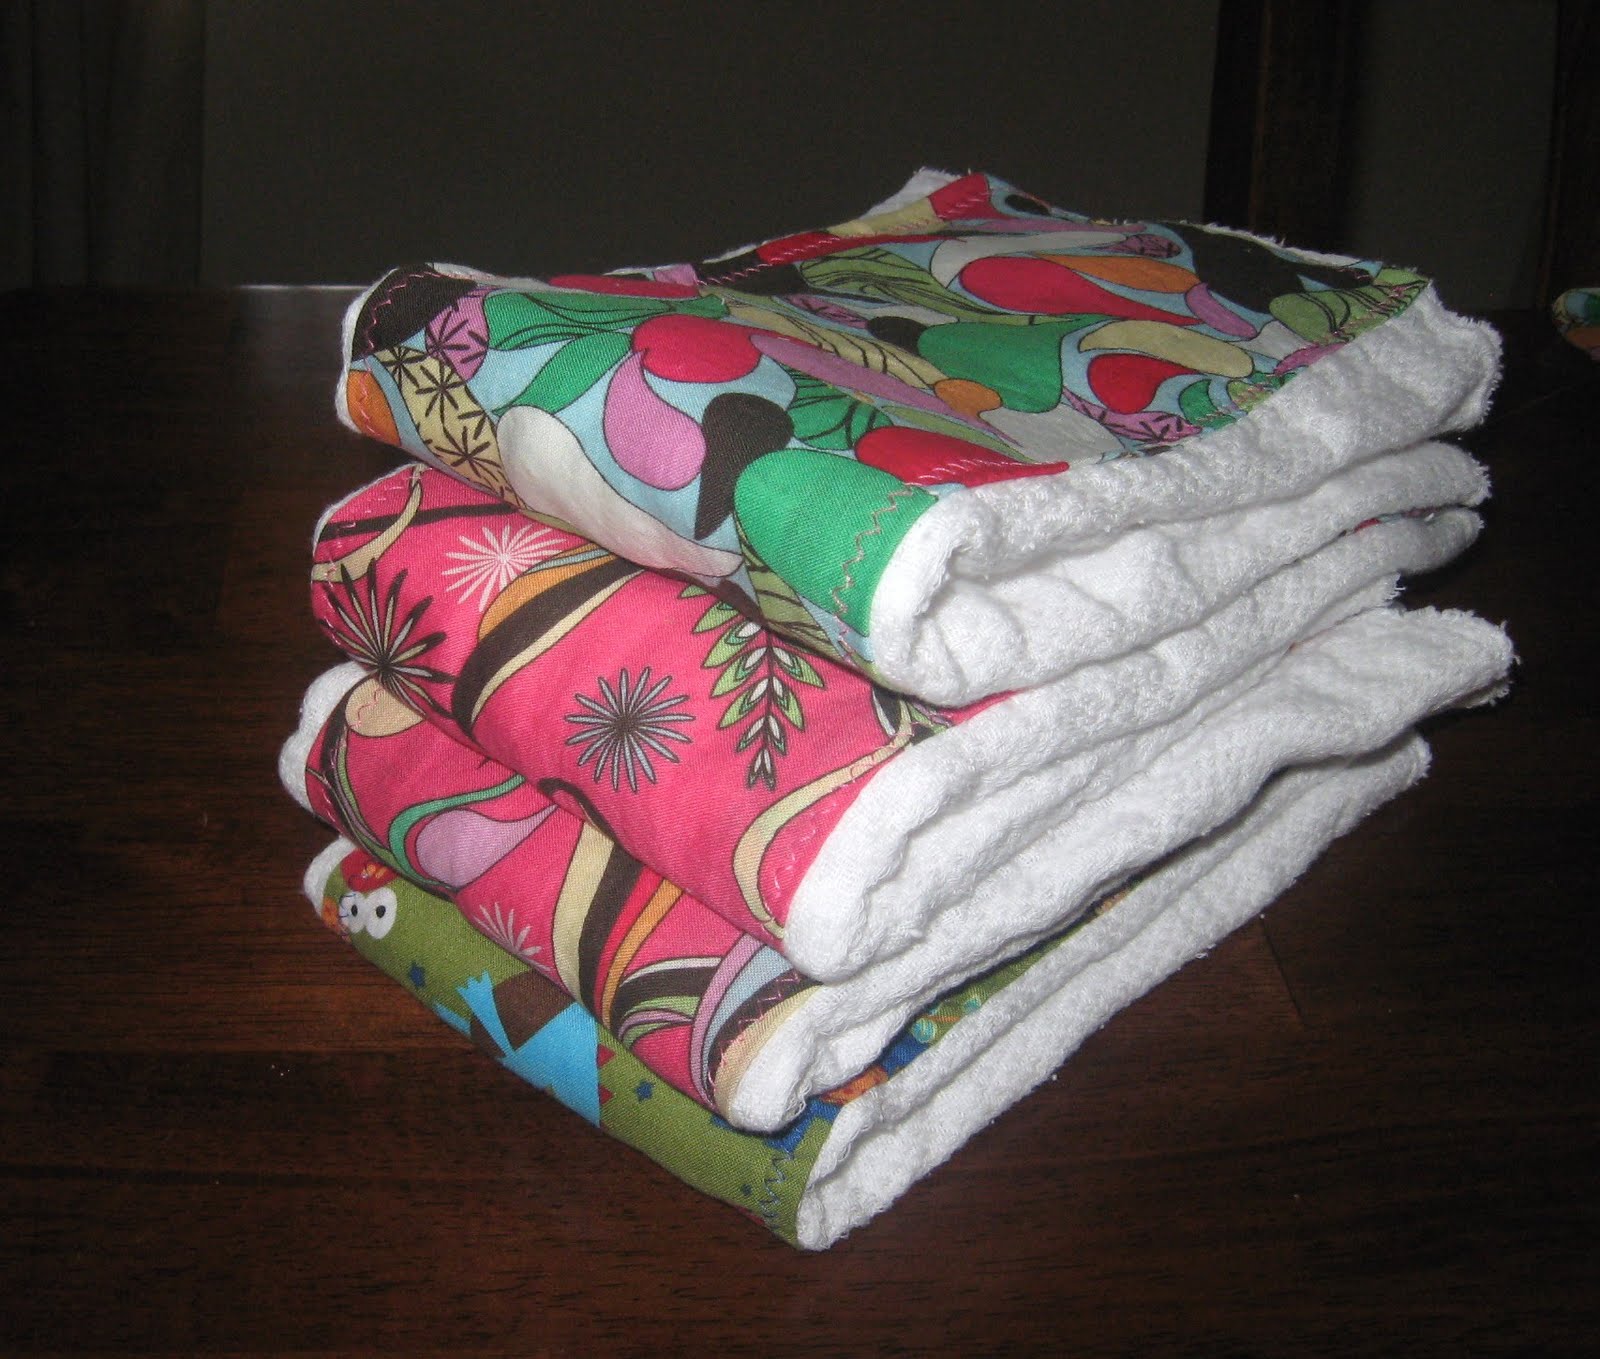
Make Something Monday : Burp Cloths
Despite some intense battles between my sewing machine and I, we have managed to finish some pretty cute baby gifts.

I feel horrible for not saving the link to the tutorial I used- but I think I just found it by skimming through some DIY blogs a few months ago (there are PLENTY out there with similar designs).
I started with some Gerber pre-fold cloth diapers (the ones with the extra padding in the middle).


I feel horrible for not saving the link to the tutorial I used- but I think I just found it by skimming through some DIY blogs a few months ago (there are PLENTY out there with similar designs).
I started with some Gerber pre-fold cloth diapers (the ones with the extra padding in the middle).

Then I cut the fabric to cover the center panel - with about 1/4 inch of extra fabric for the hem. The first time I made one I actually busted out the iron and made a nice, crisp fold - but I didn't do that on this last batch. I just pinned the edges. After the first one I made, I learned that the corners are really the only "difficult" part - so I am now extra careful to make sure it gets all folded in and stays.
I used a zig-zag stitch in a fun color. Straight lines all around - nothing fancy.

Basically, this is a SUPER easy project and inexpensive yet personal baby gift.
However, if you are a novice like me, it may be a bit frustrating.
These took me WAY too long - but now that they are done, I am glad I pressed on.
And now I have a cute gift for all the new babies in my life!!
The dinos are my fave, and I think they look cute with the bright blue thread. I found this fabric on sale when I first started sewing - way back in May :)

Wednesday, August 3, 2011
Our Homemade Pizza
We love pizza in this house. Even the baby.
When we first got married and didn't have much time to cook, Warren and I ordered pizza or heated up the frozen kind at least twice a week. Luckily we have similar tastes and are open to lots of veggies and a variety of meats. Our only disagreement involves crust - I like thin; he prefers thick. Last fall I found the solution to our crust-issue and a way to fulfill our desire for lots of toppings.
When she came to visit us last October, Henry's Grandma Deb bestowed upon me her AMAZING bread recipe.
With some simple ingredients and the magic of my Kitchen-Aid Mixer, Deb taught me the basics for a delicious artisan bread. I have now experimented with it and created baguettes, loafs, bread sticks, and, of course, pizza dough. With a few easy tweaks I can make whole wheat, flaxseed, raisin, garlic, egg, or just yummy white bread. I am eternally grateful for Deb taking the time to teach me her recipe.
My beloved pink mixer that my Grandma gave me when I got married. She has the original red one in her kitchen, and it is her wonderful baking skills that first sparked my interest.

The only ingredients required for Deb's Bread:

Letting the mixer do all the hard kneading!

The "extras" Warren and I like when we make pizza dough:
(Disclaimer: this was the first time we used the HEB brand Pizza Sauce and it, sadly, was not up to par. We prefer Ragu pasta sauce with mushrooms or garlic, or making our own.)

We like to bake chicken and tear it into pieces to put on top, along with black olives, mushrooms, and a variety of cheeses (mozzarella, asiago, parmesian). Sometimes we add pineapple and/or barbeque sauce.
Here's a sample of our finished product:

Warren has helped me figure out how to make the edge of the crust higher and more puffy (like he likes it), but I prefer thinner so sometimes I leave my side less "puffy". :) It has taken several months for me to figure out how much to roll out the dough before letting it rise, but I think I've gotten it down pretty well.
Deb's recipe makes enough dough that I either make 2 pizza crusts and freeze one for later, or I make some garlic bread to munch on before dinner. As you can see, I don't have time to use a knife this is so good! :)

And here is "the" recipe...
Thank you, Deb, for letting me share your recipe with the blogger world!
This is what she said when I asked for her permission:
"I would love for more people to see how easy baking bread and homemade pizza can be!"
So, come one friends- try out Deb's recipe and see for yourself how easy baking bread can be!
When we first got married and didn't have much time to cook, Warren and I ordered pizza or heated up the frozen kind at least twice a week. Luckily we have similar tastes and are open to lots of veggies and a variety of meats. Our only disagreement involves crust - I like thin; he prefers thick. Last fall I found the solution to our crust-issue and a way to fulfill our desire for lots of toppings.
When she came to visit us last October, Henry's Grandma Deb bestowed upon me her AMAZING bread recipe.
With some simple ingredients and the magic of my Kitchen-Aid Mixer, Deb taught me the basics for a delicious artisan bread. I have now experimented with it and created baguettes, loafs, bread sticks, and, of course, pizza dough. With a few easy tweaks I can make whole wheat, flaxseed, raisin, garlic, egg, or just yummy white bread. I am eternally grateful for Deb taking the time to teach me her recipe.
My beloved pink mixer that my Grandma gave me when I got married. She has the original red one in her kitchen, and it is her wonderful baking skills that first sparked my interest.

The only ingredients required for Deb's Bread:

Letting the mixer do all the hard kneading!

The "extras" Warren and I like when we make pizza dough:
(Disclaimer: this was the first time we used the HEB brand Pizza Sauce and it, sadly, was not up to par. We prefer Ragu pasta sauce with mushrooms or garlic, or making our own.)

We like to bake chicken and tear it into pieces to put on top, along with black olives, mushrooms, and a variety of cheeses (mozzarella, asiago, parmesian). Sometimes we add pineapple and/or barbeque sauce.
Here's a sample of our finished product:

Warren has helped me figure out how to make the edge of the crust higher and more puffy (like he likes it), but I prefer thinner so sometimes I leave my side less "puffy". :) It has taken several months for me to figure out how much to roll out the dough before letting it rise, but I think I've gotten it down pretty well.
Deb's recipe makes enough dough that I either make 2 pizza crusts and freeze one for later, or I make some garlic bread to munch on before dinner. As you can see, I don't have time to use a knife this is so good! :)

And here is "the" recipe...
Deb’s Bread Recipe
Ingredients:
Water
Salt
Active Dry Yeast
White, unbleached flour
Egg, oil, butter, flaxseed, wheat germ (if desired)
Use the KitchenAid Mixer with a dough hook.
Add 2 cups warm water (warm with sink tap, not in microwave. Bath temp).
Sprinkle 4 tsp yeast on top.
Add 2 tsp salt.
Then, add 3 cups flour (white, unbleached).
Turn mixer on (speed 2) and watch for texture. Do NOT use a spatula!! You want the dough to get itself off the sides of the bowl- this is how you know if you’ve added enough flour.
If you want to add wheat germ, flaxseed or another type of flour this is where you can add ½ cup (you adjust the flour amount then). Or, for different tastes/textures you can add an egg, oil, or butter (again, use less flour then).
Add another cup of flour (if you haven’t added a different ingredient), and slowly mix until all of the dough stops sticking to the bowl. Use speed 2 for 5-10 minutes to fully knead.
Spray a large mixing bowl with Pam.
Ball the dough and place it in the bowl.
Spray the dough with Pam.
Cover with a dish towel and place in the oven. Set oven to 350 and let dough rise for 3 minutes. After 3 minutes, turn the oven off and leave dough in oven for 20-30 minutes, until the dough has risen to 2x its original size.
Remove dough from oven and punch it down!
Make one big loaf, 2 small baguettes, pizza crust, etc.
Press out the air as you shape.
Place dough on baking sheet and cover again with towel. This time set the bread on a counter in a warm area (or cooler area if you want to leave it rising for a longer time). Let dough rise for 15-20 minutes while you preheat the oven to 425.
Cook time depends on size/type of bread you are making.
For 2 baquettes- about 30 minutes.
For pizza crust- 5 minutes, then add toppings and cook some more.
Thank you, Deb, for letting me share your recipe with the blogger world!
This is what she said when I asked for her permission:
"I would love for more people to see how easy baking bread and homemade pizza can be!"
So, come one friends- try out Deb's recipe and see for yourself how easy baking bread can be!
Monday, August 1, 2011
Make Something Monday : Birthday Party Favors
I'm glad I decided to save the plethora of baby food jars we have accumulated over the past few months. They came in handy when I wanted an original, homemade party favor for the babe's birthday party this month.

As you may recall from the last Make Something Monday post, the party theme is giraffes and the colors are a variety of bright primary colors. I had the *brilliant* idea of filling the empty baby food jars with yellow and brown candy to represent a giraffe. Lucky for me, our local HEB sells bulk Jelly Belly's in every color of the rainbow! I hope our guests like Root Beer and Banana! :)


I used the giraffe image from the banner and created little round tags that read "Thanks for coming". Thank goodness for the circle cutter I finally gave in and bought! I used ribbon to attach some of the tags to the jars and tape to stick them on the lids of others - I couldn't decide which ones I liked better.


Next, I filled the jars with the yellow and brown Jelly Belly's (more yellow than brown, to look more giraffe-like). And ta-da! Super easy, super cheap birthday party favors!

I can't wait to see what they look like at the party- all in a row on the table with the other giraffe paraphernalia! You'll have to check back in a few weeks to see the finished party!
P.S. I think I'm gonna use this idea for other holidays - I'm envisioning candy corn for Halloween and red and green M&M's for Christmas!
I'm linking up to the following parties:

As you may recall from the last Make Something Monday post, the party theme is giraffes and the colors are a variety of bright primary colors. I had the *brilliant* idea of filling the empty baby food jars with yellow and brown candy to represent a giraffe. Lucky for me, our local HEB sells bulk Jelly Belly's in every color of the rainbow! I hope our guests like Root Beer and Banana! :)

The first step was probably the most time consuming. I used Goo-Be-Gone (an AMAZING product that my dad first introduced to me years ago!!) to semi-easily remove the sticky residue left on the jars from the baby food labels.
Next, I spray painted the lids a bright blue - to match most of the party accessories.
One thing I learned the hard way during this step was that spray paint doesn't exactly dry when you live in South Texas and have 100% humidity outside! So, a few of my lids have nice big bubbles on top (Warren says they have "character"), and the other lids I brought inside to paint. Don't worry- I did it in the guest room and didn't let the baby inhale the fumes.
I used the giraffe image from the banner and created little round tags that read "Thanks for coming". Thank goodness for the circle cutter I finally gave in and bought! I used ribbon to attach some of the tags to the jars and tape to stick them on the lids of others - I couldn't decide which ones I liked better.


Next, I filled the jars with the yellow and brown Jelly Belly's (more yellow than brown, to look more giraffe-like). And ta-da! Super easy, super cheap birthday party favors!

I can't wait to see what they look like at the party- all in a row on the table with the other giraffe paraphernalia! You'll have to check back in a few weeks to see the finished party!
P.S. I think I'm gonna use this idea for other holidays - I'm envisioning candy corn for Halloween and red and green M&M's for Christmas!
I'm linking up to the following parties:
Sunday, July 31, 2011
He's Got the Whole World in His Hands
I loved that song as a child.
And now I love the "grown-up" version of it by the Christian band Fee.
I've been listening to "Arms That Hold the Universe" on repeat for days now.
No matter how old you get there is comfort in knowing that Someone greater than you is in control. Despite how chaotic this world often seems, I have to hold onto my belief that God has a plan - and that His plans are always for good.
When I'm in the middle of "the darkness"- whether it's a migraine or the death of a loved one - it's nice to become childlike and simply "rest" in those arms that are big enough to hold the whole world. Most of the time this seemingly blind faith is enough to get me through.
For the times when I start to question, though, my faith requires a bit more information from this all-powerful God. But that is for another post.
Today, I feel safe and content just singing along with Fee.
And now I love the "grown-up" version of it by the Christian band Fee.
I've been listening to "Arms That Hold the Universe" on repeat for days now.
And the arms that hold the universe
Are holding you tonight
You can rest inside
It's gonna be alright
And the voice that calmed the raging sea
Is calling you His child
So be still and know He's in control
He will never let you go
No matter how old you get there is comfort in knowing that Someone greater than you is in control. Despite how chaotic this world often seems, I have to hold onto my belief that God has a plan - and that His plans are always for good.
When I'm in the middle of "the darkness"- whether it's a migraine or the death of a loved one - it's nice to become childlike and simply "rest" in those arms that are big enough to hold the whole world. Most of the time this seemingly blind faith is enough to get me through.
For the times when I start to question, though, my faith requires a bit more information from this all-powerful God. But that is for another post.
Today, I feel safe and content just singing along with Fee.
Saturday, July 30, 2011
I didn't forget about you...
I've just been busy chasing after a very mobile baby.
Henry started crawling the day before he turned 11 months -
and he hasn't stopped since!
Henry started crawling the day before he turned 11 months -
and he hasn't stopped since!
Tuesday, July 19, 2011
Happy Birthday, Sister!
I love my sister.
She was born on this day 26 years ago. I was 4. And while I'm certain I was a great big sister back then (my mom may beg to differ) I am confident that our relationship has improved with time. As we have gotten older we have grown closer. She is not just my sister, she is my friend.
This is us playing together when she was probably 2-years-old and I was about 6. I choose to believe that is a look of joy on her face, not fear.

My sister is smart. And I'm not just saying that because she's my sister. There is a lot of evidence to prove this: she graduated with above a 4.0 from high school, she won the most prestigious scholarship offered in our town (a full-ride to any college she wanted), she attended Duke University and graduated at the top of her class, she learned Italian and studied abroad in Italy, she went to one of the best law schools in the country (UT Austin) and earned her JD - scoring at the top of her class, and she has recently passed both the Texas and New Mexico bar exams. Yes, I think you will agree, my sister is smart.
Here we are in 2005 when I went to visit her at Duke.

When I went to visit her in Venice...

My sister is fun. Now, I may not have physical evidence to prove this one, but everyone that knows her will agree. She studies hard, and plays hard. Growing up she tended to spend more time with my brother than me because she liked sports and outdoor activities more than my Barbies and dolls. She was one of the star players on her high school basketball team - taking them to State her Senior Year! Now that she's out of school she is leading a church softball league. And our nephews will attest that she is a super fun aunt. She loves to play and be silly.
Here we are "being silly" with our favorite books from childhood. She LOVED Amelia Bedelia.

Here she is with my babe in the "balla" onesie she made for him - he has one super cool Aunt!

My sister is beautiful. All you have to do is look at her pictures to grasp this truth. She is tall, slim (with athlete's muscles), has shiny natural red hair, big greenish-blue eyes, and a contagious smile. Though as a child she preferred basketball shorts and tennis shoes (which she still probably prefers, but only wears at home), she can now be found in crisp, tailored business suits and perfectly matched heels. Her simple, yet classic taste in jewelry accentuates her beauty but doesn't overwhelm it. And I know I'm not the only one who thinks my sister is beautiful - she has a handsome, loving husband who looks at her every day with eyes that reflect the beauty he sees in her. Her beauty starts within and radiates out. She loves the Lord and His Word, and she strives to live a holy life.
This is one of my favorite pictures of my sister and me with our handsome Uncle Jerry. We were bridesmaids at our brother's wedding in 2007.

And here's my sister as a gorgeous bride on her wedding day in 2010...

This is more recent pic of her - showcasing her beauty as an Aunt.

I could go on and on about my little sister, but I hope she already knows how awesome she is and how much I love her. I just wanted to dedicate my blog to her today and show the world a little bit more about her.
I love you, sister. Happy Birthday.
Monday, July 18, 2011
Make Something Monday : Birthday Banner
With the babe's first birthday coming next month I have been spending most of his nap times working on all the DIY decor I can. Since he loves his Sophie the Giraffe so much we decided to make his party giraffe themed. I have been scouring eBay and craft stores for cute giraffe things - and I'm pleased to say that I've found a lot! I don't want to spoil the party early, but I do want to share a few simple projects I've been working on.
I found this adorable giraffe image, which I'm using throughout the party.

Today I finished the Birthday Banner!
I may have made it a bit too big, so I'm not sure where it will hang for the party, but I did some "test" hanging today just to show you. You'll have to come back in a month to see the final outcome! :)
I just used brightly colored cardstock and cut circles using a paper plate as the template. My sister-in-law informed later that they make these handy tools called "circle cutters" that would have made my job MUCH easier. Oh well. I'll be sure to get one for next time, though.

For the letters, I already had a supply of cardstock letters that I just glued onto the circles. You could also cut out your own letters, using any type of paper you want.
Then, I punched 2 holes at the top of each circle. I didn't measure them, but I guess if you are more OCD than me, you could. :)
Finally, I strung ribbon through each letter. I decided to do each word separately so I could have more flexibility when I eventually hang them.


I was too lazy to take all the crosses off the wall for today's photo shoot, but if that is where I hang the banner for his party, I will take all the crosses down.
I like how his name looks so much that I may hang just this part in his room after the party!

Thursday, July 14, 2011
Thrifty Mess Mat, Placemat and Matching Bib
Now that the babe likes to feed himself he also thinks it's fun to throw his leftovers on the floor. And since I don't feel like adding a dog to our family just yet, I needed a simpler (cheaper!) solution.
I spent hours online searching for a cute "mess mat" to put under his chair - only to find that they are OUTRAGEOUSLY priced! Thirty bucks for a piece of plastic!?!? I think not.
Thus, I decided to make my own...

Luckily for me it's summer - time for picnics and cheap plastic gear. I headed to my local Big Lots and was PLEASANTLY surprised to find a TON of super cute, super cheap (i.e. $3.50) vinyl covered tablecloths!! The only hard part was choosing colors that wouldn't look too tacky in my dining room. I ended on a simple, tasteful blue and white design by Waverly.
When I got home and unfolded it I realized that it was big enough for me to cut up and make matching "accessories". Which was convenient since I really wanted a "wipeable" placemat to leave near Henry's chair so that I can set his half-eaten bananas and messy spoons on it without making a total mess of my table.
Here's the placemat and mess mat. It's one of my very first sewing projects and all I did was play around with different stitches for the edges - nothing fancy, just functional.

Today, I finally tackled the matching bib.
I found several great tutorials online (I'm kinda addicted to reading craft blogs lately), but the one I mainly followed is at My Own Road. Except I decided not to attempt a pocket this go round.
First, I traced one of the babe's bibs (I used 2 pieces of the table cloth so it'd be "wipeable" on both sides).

Then I pinned white bias tape around the edges. This is my first time using bias tape and it's so neat how simple and effective it is at making neat edges! I think I may be addicted.

And then I sewed it all together. Let's just say this took a bit longer than I had hoped because the curves gave me some trouble- I had to rip out a few seams, but eventually got it (good enough, anyway :)

I used some adhesive velcro that I had laying around to attach the neck straps. Luckily it was big enough for the babe's neck!
It's not perfect, but for a beginner such as myself I think it all looks pretty good :)
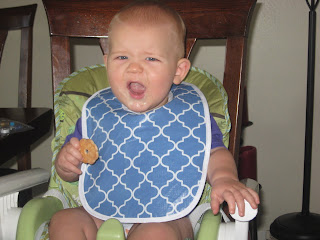
My usually happy model was tired of pictures today, but I still think he's cute!
Subscribe to:
Posts (Atom)