I spent hours online searching for a cute "mess mat" to put under his chair - only to find that they are OUTRAGEOUSLY priced! Thirty bucks for a piece of plastic!?!? I think not.
Thus, I decided to make my own...
Luckily for me it's summer - time for picnics and cheap plastic gear. I headed to my local Big Lots and was PLEASANTLY surprised to find a TON of super cute, super cheap (i.e. $3.50) vinyl covered tablecloths!! The only hard part was choosing colors that wouldn't look too tacky in my dining room. I ended on a simple, tasteful blue and white design by Waverly.
When I got home and unfolded it I realized that it was big enough for me to cut up and make matching "accessories". Which was convenient since I really wanted a "wipeable" placemat to leave near Henry's chair so that I can set his half-eaten bananas and messy spoons on it without making a total mess of my table.
Here's the placemat and mess mat. It's one of my very first sewing projects and all I did was play around with different stitches for the edges - nothing fancy, just functional.
Today, I finally tackled the matching bib.
I found several great tutorials online (I'm kinda addicted to reading craft blogs lately), but the one I mainly followed is at My Own Road. Except I decided not to attempt a pocket this go round.
First, I traced one of the babe's bibs (I used 2 pieces of the table cloth so it'd be "wipeable" on both sides).
Then I pinned white bias tape around the edges. This is my first time using bias tape and it's so neat how simple and effective it is at making neat edges! I think I may be addicted.
And then I sewed it all together. Let's just say this took a bit longer than I had hoped because the curves gave me some trouble- I had to rip out a few seams, but eventually got it (good enough, anyway :)
I used some adhesive velcro that I had laying around to attach the neck straps. Luckily it was big enough for the babe's neck!
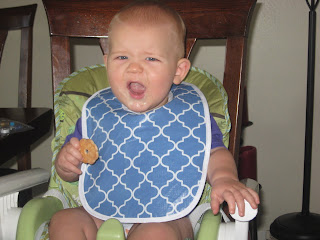
It's not perfect, but for a beginner such as myself I think it all looks pretty good :)
My usually happy model was tired of pictures today, but I still think he's cute!


Way to go!!! I think your fist bib attempt came out awesome, and I have to say I never really cared for those pocket bibs anyway. They're hard to clean out, if you ask me. He's such a cute boy!
ReplyDeleteYou are amazing. I am so impressed!!!
ReplyDeleteSuch a great idea! It all looks great! I too have discovered a love for bias tape. I made napmats for my kids last year before they started preschool. Definitely the way to go.
ReplyDeleteAdorable! And the bib is pretty cute too ;) I love the pattern you chose!
ReplyDeletethis is such a great idea! I love it! and you did an amazing job! I found your blog through a link party and LOVE it! I am your newest follower and would love it if you would check out my blog and follow me too! Thanks!
ReplyDelete-Nikki
http://chef-n-training.blogspot.com/
Thanks, everyone, for your sweet and encouraging comments!
ReplyDeleteYou are so thrifty! I hope to start learning to sew soon too--maybe after life settles down with #3. Call me sometime!
ReplyDelete